There’s something about moving the party outdoors that instantly transports us to another place. Maybe it’s dining during twilight hours, enjoying a little fresh air, or the relaxed vibe of a backyard barbecue...whatever it is, we automatically feel like we’re on vacation. And although it’s the simple style that makes this party appealing, we think it would be fun to surprise guests with some unexpected creative elements to commemorate the end of summer and remind them of their favorite getaways.
Because we’re all about easy and natural, we didn’t look farther than our own home and backyard for the DIY decor. Within a couple of meditative hours (aren’t crafts relaxing?), we pieced together a doable tablescape that speaks to everyone’s love of travel. Of course, though, no theme is required to make this seed packet place card, recycled paper table runner, and wildflower table arrangements—just have fun with it and and get lost for an afternoon.
Here’s how you can turn your backyard into a little oasis for guests (veteran party host experience not required).

Materials Needed: {1} Ruler or an item with a straight edge; {2} Postcards; {3} Natural Glue and Scissors; {4} Needles and colorful thread; and {5} Seed packets and a paper bag.

Step 1: Measure and cut the postcard to a smaller size. Because this project is not about precision, we used a smaller 3” x 4” notecard to mark our guidelines for cutting. Ultimately, this postcard will serve as the outer layer of the seed packet place card.
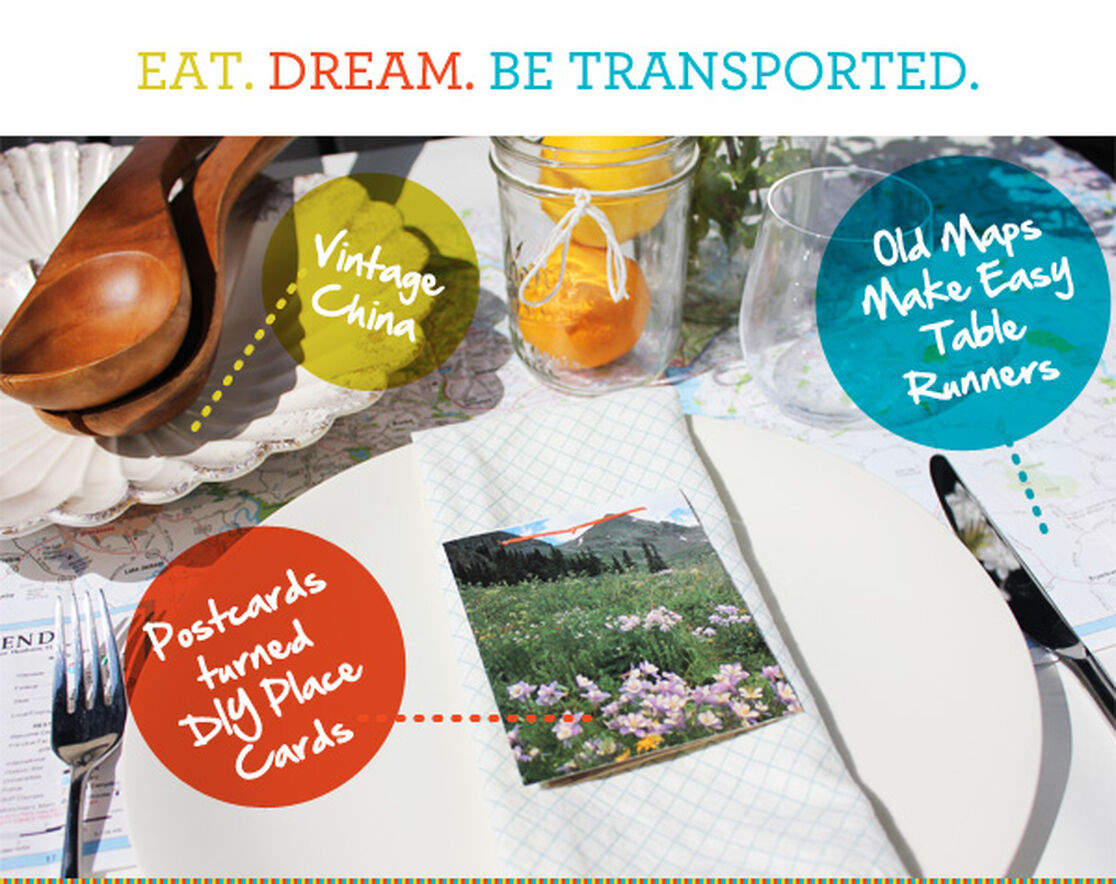
Honest Tip: Don’t feel constrained by having to use postcards. If you’re like Honest Sarah, who saves holiday and birthday cards for DIY activities, you can repurpose the card fronts instead. Similarly, flexible cardboard products like tissue and cereal boxes would work equally well to make the matchbook-like place card cover.
Step 2: Every once and awhile we’ve been known to forget our reusable bags when we go grocery shopping, so we bring home paper bags that we keep on hand for crafting. Cut out the large, seam-free side of the bag and fold it in half. Then trace your trimmed postcard on three sides (the fourth side should be the folded seam) and cut out what will make your seed packet.

Step 3: To make the seed packet, fold the two longer sides of paper bag piece inward by approximately ⅛”. Next, glue the flaps to each other and then to the body of the packet. Once all packets are formed, distribute a seed packet or two between them. Fold over the top of the packet and secure with glue.
Honest Tip: Consider gifting seeds from plants native to your region because they’ll work with the conditions of your climate and be easier to cultivate. Those who don’t have green thumbs will appreciate this.

Step 4: Fold the top of your postcard along a straight-edge ruler to create a nice, crisp crease.
Step 5: Insert your paper bag seed packet into the fold of the postcard and sew together. To do this, you could use a sewing machine to power through the cardboard and create interesting stitch patterns. But because we’re no fuss, we just eyeballed it using a larger needle to puncture the cardboard and a create two large stitches with bright colored thread. Weave through the openings a few times until the the seed packet is bound and secure. Knot on the backside. Snip the excess thread. (Staples are an option, too.) And, that’s it, you’ve created a place card that guests can take home as a party favor.

Step 6: To make for a memorable discussion, we chose to use the place cards as conversation starters. So instead of names, we posed the question: “Dream Vacation?” You could also ask: “Favorite Childhood Trip?,” “Best Roadtrip?,” “Summer Romance?”....
Step 7: For the table runner, we used the pile of AAA maps that we’ve collected over the years and have since been replaced by Google and GPS systems. We cut them along a natural fold in the map (again, no measuring or marking!) to a width that fit our picnic table and taped them together on its hidden side.
Step 8: To bring the rest of the table to life, we used flowers and oranges from our yard displayed in mason jars (they also make great drinking glasses). You could use any assortment of flowers and greenery, including tall grasses, branches, aromatic herbs like rosemary, or a collection of blooms from your local grocery store or farmers’ market.
Now it’s time to sit back, relax, and serve up your delish food in style!
This is the third post in a series of four about how to throw an inspired and easy end-of-summer barbecue. Read more about our favorite recipes and the household items we’d use to host this party, and stay tuned for tomorrow’s Style Simplified post.
We aim to provide you with the most honest and credible information possible. This article was reviewed for accuracy by The Honest Team and was written based on sources that are linked at the bottom of the article.
blog_review_statement