
Age-appropriate chore charts are a great way to encourage independence, teach kids about responsibility, and make them feel like an important team member in your household. Of course little ones may need some help here and there, but the visual reminder of their success will help facilitate the learning process and build positive habits. Plus, they can be an especially great tool to help smooth the transition from summer to school as you try to re-establish your routine for Fall.
Things you'll need:
- Scissors
- Xacto Knife
- Map pins or tacks
- Hang tags or paper clips (get creative - anything you can hang from the map pins)
- Cardboard boxes
- Colored pencils or markers
- Envelope
- Glue

1. Start out by creating a nice "blank canvas" with an old Honest box. Cut the box open at the seam with an Xacto knife or any craft blade and then cut off the flaps at the top and bottom of the box (hold on to flaps, you'll use those later on).
Honest Melissa's Tip: Scissors and cardboard, for whatever reason, just don't make a fun combination. An Xacto knife is so much easier and precise!
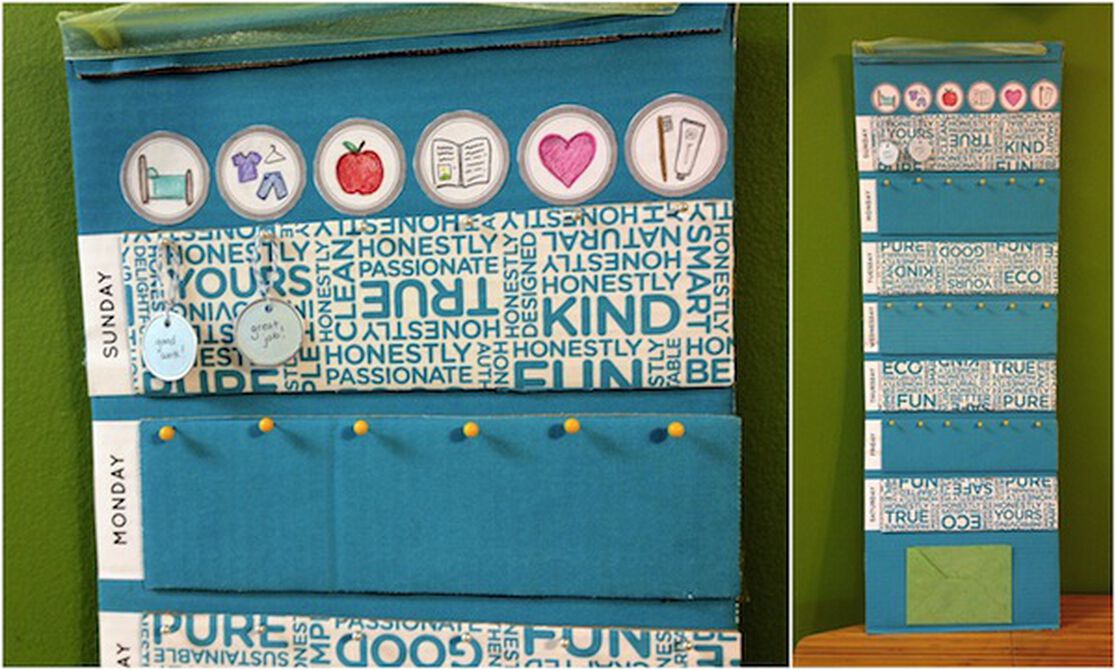
2. Use the flaps as is, or cut them down to your preferred size until you have 7 uniform strips. Lay them out on the long piece of cardboard you just cut the flaps from — I alternated between a plain teal strip and a patterned strip. These 7 cardboard strips will represent each day of the week.

3. Hand write the days of the week or if your penmanship could use a little oomph... type them up! Cut them out and space out each cardboard strip with each day of the week until they're right where you want them. Once they're in place glue them all down.
4. Instead of just listing out each activity why not draw them up? It creates a nice pop of color and makes each activity a little bit open to interpretation (plus, toddlers who can't yet read can follow the visual cues). For example you can use an apple to represent eating your fruits & veggies or having a healthy snack...or just finishing a meal in general! Or a heart to represent the act of sharing, doing something nice for someone or saying please and thank you. I used a circle template from MarthaStewart.com (normally used for spices) to draw each picture on. Cut them out and glue them to the top of your chart.

5. Lay an extra piece of cardboard underneath your chart and stick tacks or map pins into the cardboard to represent each activity. You also can dip the pins in glue or use drop of hot glue before sticking them in the chart to make them extra secure.
6. Use fun colored paper clips or pick up some plain hang tags at your local office supply or craft store to write encouraging messages or check marks to hang on each pin when an activity is complete. Kids have fun selecting the tag to mark of their accomplishment.

8. Glue an envelope at the bottom of the chart to store your paper clips or hang tags.
7. Cut two slits at the top of your chart to thread ribbon through or use binder clips to hang up your new repurposed box!

Inspired? Share your version of the chore chart…Comment below, Instagram or Tweet a photo using #HonestDIY or post on our Facebook page!
We aim to provide you with the most honest and credible information possible. This article was reviewed for accuracy by The Honest Team and was written based on sources that are linked at the bottom of the article.
blog_review_statement